
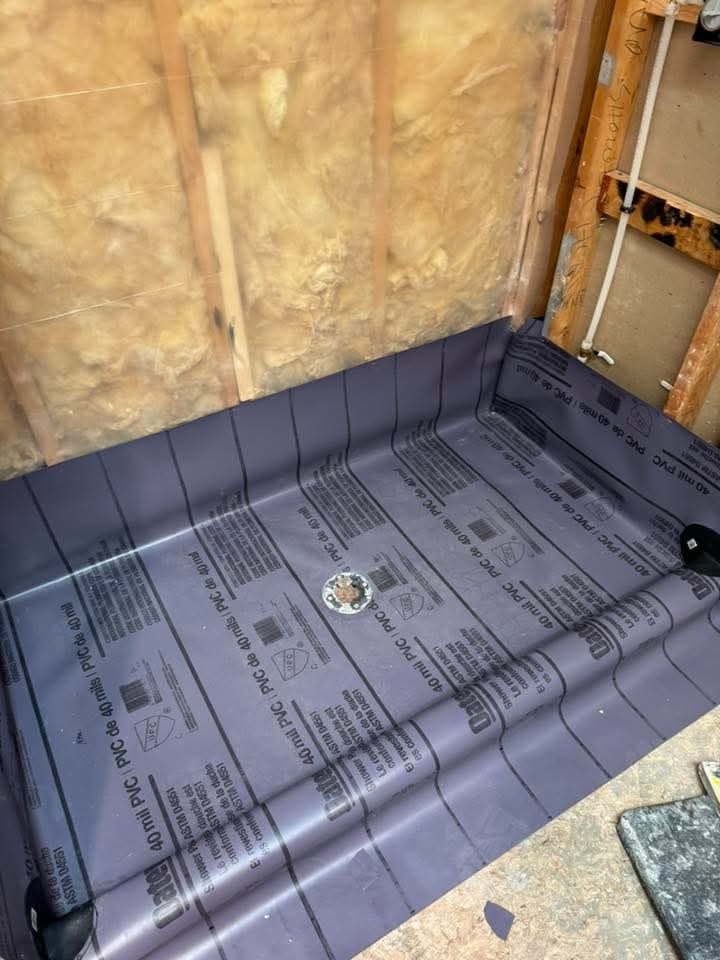
Shower waterproofing is the layer that keeps water inside the wall instead of letting it reach the framing behind it. In a bathroom remodel, it goes in before any tile is set. When it is done right, the shower stays dry behind the wall over time. This guide explains what waterproofing does, what to ask your contractor, and what to check during the job in Wellington and nearby areas.
Why Waterproofing Comes Before Tile
Tile looks like a waterproof surface, but it is not. Grout lines and the thin mortar under each tile let water pass through. Behind the tile, the wall needs a second layer that stops that water and sends it down the drain. That layer is the waterproofing membrane. Once tile is set on top of it, the membrane is hidden for good, so it has to be correct on the first try.
Many homeowners are surprised to learn how much work happens before the tile crew arrives. Cement board or greenboard goes up first. Then the membrane goes on, followed by corner tape, seals, and a cure time. Each step depends on the one before it. A rushed step often shows up later as a leak, a soft floor, or stains on the ceiling below.
Common Waterproofing Methods
Crews use a few different systems. Some use a liquid membrane that is rolled or troweled onto the wall. Others use a sheet membrane that is attached to the wall and sealed at every seam. Both can work well when a crew follows the product instructions closely. The key is not which product is used. The key is that the system is complete, continuous, and sealed at every opening.
Ask which system your contractor prefers and why. A good answer will explain how the product works with your wall type and your tile. If the answer is vague, ask for a short written description of the plan.
The Shower Pan and Slope
The floor of the shower, often called the pan, needs a slight slope toward the drain. Without that slope, water sits on the floor. It then soaks into the grout and the subfloor over time. A proper pan also needs a waterproof liner that turns up the walls. Ask how the liner connects to the drain. A good connection is sealed at the drain flange, with no gap where water can escape.
Curbs, Niches and Other Weak Spots
Most leaks start at details, not at the flat walls. Look closely at these areas:
- Curbs. A curb is the raised edge at the shower entry. The waterproofing should run over the top of the curb and down the outside, not stop at the tile line.
- Niches. A recessed shelf needs the same protection as the wall around it. Its corners and bottom are common places for leaks.
- Valves and shower arms. Every pipe that comes through the wall must be sealed tightly to the membrane.
- Inside corners. Corners and seams should have a reinforcing strip and a sealant over the joint.
What to Ask Your Contractor
You do not need to be an expert to ask good questions. Start with these:
- What waterproofing system will you use, and is it installed before tile?
- How will the shower pan be sloped and sealed to the drain?
- Will the curb, the niche, and the valve openings be waterproofed too?
- Can I see the membrane before the tile goes on?
- Does the tile setter follow the membrane maker's guidance for mortar and grout?
A clear answer to each question is a good sign. If the answers are vague, ask for more detail before the work starts.
Checking the Work During the Job
Take photos at each stage. Photos of the open wall are very useful later if you ever need to open the shower for a repair. Watch for the membrane being pierced by staples or screws in the wrong place. Check that seams overlap and that every joint is sealed. Some crews run a water test before tile is set, which means filling the pan and checking for leaks. Ask whether that test is part of the plan.
Why Local Conditions Matter
Homes in Boynton Beach, Wellington, West Palm Beach, Palm Beach Gardens, and North Palm Beach deal with heat and humidity for much of the year. Moisture moves through walls more easily in this climate. A small leak can lead to mold or a soft subfloor if it goes unnoticed. That is one more reason to get the waterproofing right the first time.
Good airflow also helps. A working exhaust fan, a shower door or curtain that keeps spray inside the tub area, and a quick wipe-down after use all help keep the bathroom dry. These habits do not replace good waterproofing, but they support it.
Planning Your Bathroom Remodel
Shower waterproofing is one part of a bigger bathroom project. Plan the layout, fixtures, tile, and lighting together. Then ask your contractor how waterproofing fits into the schedule. Good planning avoids rushed choices when the walls are open. If you want help thinking through the whole project, our remodeling services page is a good place to start.
Next Steps
Shower waterproofing is hidden work, so it pays to ask questions early. Ask about the system, the pan, the curb, and the niche before the tile arrives. Check the work with photos, and keep notes on what was installed. Art Lego LLC is based in Wellington, FL, and serves Palm Beach County, St. Lucie County, and Martin County. To request a free estimate, call 561-574-3769 and we will walk through your bathroom plans with you.
Frequently Asked Questions
Does shower waterproofing go in before or after tile?
It goes in before tile. The membrane sits between the wall board and the tile, so it has to be finished and sealed before the tile crew starts.
What is the most common place for a shower leak?
Leaks often start at details like the curb, a recessed niche, valve openings, and inside corners. These spots need extra care during installation.
Can I check the waterproofing myself?
You can ask to see the membrane before tile goes on and take photos at each stage. Ask your contractor about any water test they plan to run.
Do I need waterproofing if I only replace the tile?
Replacing tile often means opening the wall or floor. Ask your contractor whether the membrane underneath is sound before new tile goes on.